Technical Considerations for the Installation of ASAHIAV Plastic Valves – A Comprehensive Guide to Ensuring Safe Installation, Reliable Operation, and Long Service Life (Part 1)
27/07/20261. Introduction
In water treatment systems, chemical processing plants, semiconductor manufacturing, food and beverage production, pharmaceutical facilities, and many other industrial applications, plastic valves play a critical role in controlling flow rate, pressure, and flow direction. However, even when high-quality products such as ASAHIAV plastic valves are used, improper installation may still result in leakage, reduced equipment service life, or even compromise the performance of the entire piping system.
As one of Japan’s leading manufacturers of industrial plastic valves and piping systems, ASAHIAV has developed comprehensive technical guidelines to help users install and operate its products in accordance with the manufacturer’s recommended practices.
In Part 1 of this article, we focus on the key technical considerations before and during the installation of ASAHIAV plastic valves. Following these recommendations not only ensures stable system operation but also minimizes maintenance costs and extends the service life of the entire piping system.
2. Why Is Proper Installation Important?
Many piping system failures are not caused by product defects but by improper installation practices.
According to ASAHIAV’s recommendations, correctly installed valves provide several important benefits.
Ensures System Safety
Proper installation helps to:
- Reduce the risk of chemical leakage.
- Minimize abnormal pressure build-up.
- Reduce the possibility of damage to piping and equipment.
For systems handling corrosive chemicals or hazardous process media, proper installation is particularly important for ensuring operator safety.
Extends Valve Service Life
Avoiding excessive mechanical loads on the valve body, tightening flange bolts to the specified torque, and selecting appropriate materials help to:
- Reduce mechanical stress on the valve body.
- Prevent deformation.
- Minimize wear of sealing components.
- Extend the service life of the valve.
Maintains Operating Performance
A properly installed valve will:
- Maintain the designed flow capacity.
- Reduce pressure loss.
- Ensure smooth and reliable opening and closing operation.
- Improve the operating efficiency of the entire system.
Reduces Maintenance Costs
Proper installation from the outset helps minimize:
- Leakage.
- Premature gasket replacement.
- Actuator damage.
- Unplanned system shutdowns.
As a result, overall maintenance costs throughout the valve’s service life can be significantly reduced.
3. Pre-installation Inspection
Before installing the valve into the piping system, ASAHIAV recommends performing the following inspections.
3.1 Verify the Correct Valve Model
Confirm that the actual valve matches the system design specifications, including:
- Valve type
- Nominal size (DN)
- End connection type
- Operating pressure
- Valve body material
- Seal material
Do not install the valve if its specifications do not match the system requirements.
3.2 Verify Material Compatibility
Ensure that the selected valve material is compatible with the intended process media.
Typical valve body materials include:
- PVC-U
- HI-PVC
- CPVC
- PP
- PVDF
Also verify the sealing materials, such as:
- EPDM
- FKM
- PTFE
Selecting the correct materials helps prevent chemical attack, material degradation, and loss of mechanical properties during operation.
3.3 Verify Operating Conditions
Compare the system operating conditions with the valve’s rated operating limits, including:
- Operating pressure
- Operating temperature
- Process media
- Chemical concentration
The valve must never be operated beyond the limits specified by the manufacturer.
3.4 Visual Inspection
Before installation, carefully inspect the following components:
- Valve body
- Flanges
- Threads
- Operating lever
- Actuator
- Seals
- Sealing surfaces
If any of the following conditions are found:
- Cracks
- Deformation
- Impact damage
- Damage incurred during transportation
the valve should not be placed into service.
4. Storage and Transportation Before Installation
Even before installation, improper storage and transportation may adversely affect the quality and performance of the valve.
4.1 Avoid Severe Impact
Although plastic valves offer good impact resistance, they may still be damaged by:
- Cracking
- Deformation
- Flange damage
if dropped or subjected to excessive mechanical impact.
During transportation:
- Keep the valve in its original packaging.
- Do not throw, drop, or drag the valve across hard surfaces.
4.2 Avoid Direct Sunlight
Do not store plastic valves outdoors for extended periods.
Prolonged exposure to ultraviolet (UV) radiation and high temperatures may cause:
- Material aging
- Reduced mechanical strength
- Premature deterioration of sealing components
The valves should be stored in a clean, dry, and well-ventilated area away from direct sunlight.
4.3 Do Not Stack Excessive Loads
Do not place heavy objects on top of the valve or actuator.
Continuous loading over an extended period may result in:
- Valve body distortion
- Flange deformation
- Misalignment of the operating mechanism
4.4 Storage Conditions
ASAHIAV recommends storing valves under the following conditions:
- In a clean environment
- Free from dust contamination
- Away from corrosive chemicals
- Keep the protective caps on all end connections until installation
These precautions help prevent dust and foreign matter from entering the valve.
5. Installation Guidelines for ASAHIAV Plastic Valves
After completing all required inspections, the valve should be installed in accordance with the manufacturer’s recommended procedures to ensure reliable performance throughout its service life.
5.1 Prepare the Piping System
Before installing the valve, inspect the entire piping system.
Ensure that:
- The piping has been thoroughly cleaned.
- No metal chips remain inside the pipe.
- Sand, dust, and other foreign materials have been completely removed.
- Pipe ends are cut square.
- All mating surfaces are clean and free from damage.
For newly installed piping systems, flushing the pipeline before valve installation is strongly recommended to prevent debris from damaging sealing surfaces or obstructing internal valve components.
5.2 Align the Piping Properly
Proper pipe alignment is one of the most critical requirements when installing plastic valves.
Both pipe ends must be accurately aligned before positioning the valve.
The valve must not be used to:
- Pull two pipe ends together.
- Compensate for piping misalignment.
- Correct the direction of the piping.
Doing so will introduce excessive mechanical stress into the valve body, resulting in reduced service life and an increased risk of leakage during operation.
5.3 Do Not Allow the Valve Body to Support Piping Loads
One of the most common causes of valve body cracking or leakage at connection points is mechanical loading imposed by the piping system.
According to ASAHIAV, the valve body is designed solely to control the flow of process media and is not intended to support the weight of piping or adjacent equipment.
During installation, avoid the following situations:
- Sagging pipelines transferring their weight onto the valve.
- Pipe misalignment causing flange distortion.
- Heavy equipment such as pumps or actuators imposing loads on the valve body.
- Using the valve as a structural support for the piping system.
Where long pipe runs or significant piping weight are involved, additional supports should be installed, such as:
- Pipe Supports
- Pipe Saddles
- Pipe Hangers
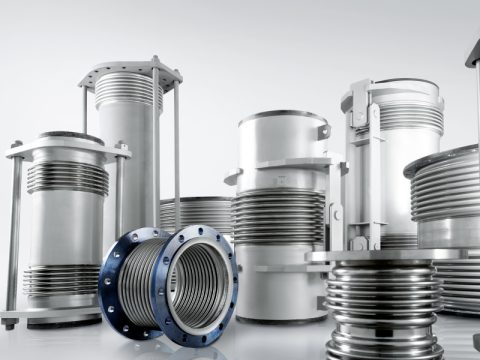
- Expansion Joints, where required
A properly designed pipe support system eliminates excessive mechanical stress on the valve, maintains leak-tight connections, and extends the service life of the entire piping system.
5.4 Provide Sufficient Maintenance Clearance
In practice, many piping systems are installed with insufficient space around the valve, making maintenance and replacement difficult.
ASAHIAV recommends providing adequate clearance around the valve to facilitate:
- Removal of the actuator
- Replacement of sealing components
- Internal valve cleaning
- Periodic inspection
- Complete valve removal for maintenance or replacement
For valves equipped with pneumatic or electric actuators, sufficient overhead clearance should also be provided so that the actuator can be removed without dismantling the piping system.
Providing adequate maintenance space significantly reduces system downtime during servicing and replacement.
5.5 Verify the Installation Orientation
Not all valve types can be installed in any orientation.
Before installation, verify:
- The flow direction arrow marked on the valve body
- The installation orientation specified in the product catalogue
- The mounting position of the actuator, where applicable
For the following valve types:
- Check Valve
- Diaphragm Valve
- Actuated Butterfly Valve
- Actuated Ball Valve
incorrect installation may result in:
- Incomplete valve shut-off
- Reduced flow capacity
- Increased operating torque
- Reduced actuator service life
After installation is completed, the flow direction should be checked once again before the system is placed into operation.
5.6 Install the Actuator Properly
For automatically actuated valves, the actuator shall be installed strictly in accordance with the manufacturer’s installation instructions.
During installation, observe the following precautions:
- Do not use the actuator as a lifting point.
- Do not allow electrical cables or pneumatic tubing to carry mechanical loads.
- Do not rotate the actuator unless the prescribed disassembly procedure has been followed.
- Verify the valve travel after installation has been completed.
After all electrical or pneumatic connections have been completed, perform several opening and closing cycles to confirm that:
- The valve closes completely.
- The valve opens completely.
- No abnormal noise or vibration occurs during operation.
- No leakage is observed at any connection point.
6. Installation Precautions for Different Connection Types
Each connection method has its own technical requirements. Following the correct installation procedures helps ensure reliable sealing performance and minimizes the risk of damage during operation.
6.1 Flanged Connections
For flanged valves, ASAHIAV recommends the following installation procedures:
- Thoroughly clean the flange faces before installation.
- Verify that the gasket is of the correct size and material.
- Accurately align the mating flanges.
- Tighten the flange bolts using a diagonal (star) tightening sequence.
- Tighten the bolts gradually in several stages, increasing the torque evenly.
Do not:
- Tighten the bolts sequentially in a circular pattern.
- Tighten one side before the other.
- Apply excessive torque beyond the manufacturer’s recommended tightening torque.
Improper or uneven bolt tightening may result in:
- Flange deformation
- Gasket leakage
- Process media leakage
- Cracking of the plastic valve body
6.2 Solvent Cement Socket Connections
For socket-type solvent cement connections:
Before applying solvent cement:
- Clean both the pipe end and the socket thoroughly.
- Remove all grease, oil, dust, and other contaminants.
- Verify that the pipe end has been cut square.
- Chamfer the pipe end slightly if necessary.
During solvent cementing:
- Use only the solvent cement recommended for the piping material.
- Apply an even coat of solvent cement to both the pipe end and the socket.
- Insert the pipe fully to the specified insertion depth.
- Hold the joint firmly for several seconds to prevent rotation.
After assembly, allow sufficient curing time before performing a pressure test or placing the system into operation.
Pressure testing before the joint has fully cured may reduce joint strength and result in leakage.
6.3 Threaded Connections
For threaded connections:
- Ensure that the threads are free from damage.
- Thoroughly clean all threaded surfaces.
- Apply PTFE thread seal tape or an appropriate thread sealant.
Do not:
- Apply excessive amounts of PTFE thread seal tape.
- Overtighten the connection using a large wrench or excessive force.
Excessive tightening torque may cause:
- Cracking of the plastic threaded connection
- Valve body deformation
- Reduced sealing performance
For high-pressure applications, always tighten threaded connections in accordance with the tightening torque specified in ASAHIAV’s technical documentation.
7. Conclusion (Part 1)
Proper installation is the first and most critical factor in determining the performance, safety, and service life of ASAHIAV plastic valves. Thorough pre-installation inspection, accurate pipe alignment, elimination of excessive mechanical loads on the valve body, and strict adherence to the recommended installation procedures for each connection type all contribute to stable system operation, minimize the risk of leakage, and reduce the likelihood of unexpected failures during service.
However, even a correctly installed system may still experience operational problems if proper operating and maintenance practices are not followed in accordance with the manufacturer’s recommendations.
In Part 2, we will continue with ASAHIAV’s essential recommendations for valve operation, periodic inspection, preventive maintenance, replacement of wear components, and the common mistakes that should be avoided when operating ASAHIAV plastic valves. Following these guidelines will help maximize valve service life and ensure reliable, long-term system performance.